Brightening Dark Photo Subjects
Overview: The purpose of this exhibit is to show how combining the use of selection tools, adjustment layers, and the healing brush/clone stamp can help lighten dark foregrounds in photos.
Design Principles:
No design principles were taken into consideration, as the objective of these edits was to improve the overall existing composition of the photo.
Photoshop Skills:
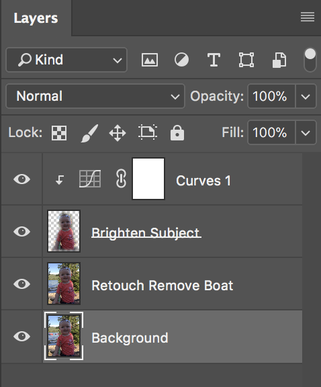
I first started by cleaning up the background of this photo by using the lasso selection tool, and the content aware fill option to remove the ski-boat and inflatable tube. I then used the spot healing brush, healing brush, and clone stamp to touch up the water and surrounding trees.
To lighten the foreground of the photo, I selected the child using the lasso tool. To avoid a dramatic edge, a feather was set by using the select menu > modify> feather. I then copied the selection on to a new layer using the shortcut cmd + J. From here I selected a curves adjustment layer and made the necessary adjustments to lighten the photo, with a special emphasis on keeping the skin tones looking natural.
While making these edits and lightening the foreground, the background was also receiving the same treatment. To return the background to its original state, I hovered the cursor over the line between my curves layer and the background held the option key and clicked. This made it so the curves layer was only applied to my subject in the foreground.
Lastly I finished off the photo by doing one last pass over with the spot healing brush to fix any minor problems with the photo.
Credits:
Image taken by: Chelsey Wilson
Design Principles:
No design principles were taken into consideration, as the objective of these edits was to improve the overall existing composition of the photo.
Photoshop Skills:
I first started by cleaning up the background of this photo by using the lasso selection tool, and the content aware fill option to remove the ski-boat and inflatable tube. I then used the spot healing brush, healing brush, and clone stamp to touch up the water and surrounding trees.
To lighten the foreground of the photo, I selected the child using the lasso tool. To avoid a dramatic edge, a feather was set by using the select menu > modify> feather. I then copied the selection on to a new layer using the shortcut cmd + J. From here I selected a curves adjustment layer and made the necessary adjustments to lighten the photo, with a special emphasis on keeping the skin tones looking natural.
While making these edits and lightening the foreground, the background was also receiving the same treatment. To return the background to its original state, I hovered the cursor over the line between my curves layer and the background held the option key and clicked. This made it so the curves layer was only applied to my subject in the foreground.
Lastly I finished off the photo by doing one last pass over with the spot healing brush to fix any minor problems with the photo.
Credits:
Image taken by: Chelsey Wilson
