
Photo after being retouched.

Original Photo
Retouching & Manipulating Photos
Overview: The purpose of this exhibit is to demonstrate the use of the content aware fill, spot healing brush, healing brush, and clone stamp tools in Photoshop.
Design Principles:
Photoshop Skills:
I started by taking a .jpg photo and enlarging it a bit to create more space off to the right of the photo. To do this I used the crop tool to enlarge the canvas, selected the empty area, and then used the content aware fill option to fill the void space. I used the clone stamp, spot healing brush and healing brush to help the photo addition appear a bit more natural.
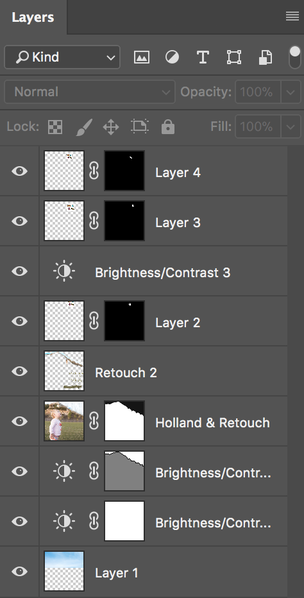
I wasn't a huge fan of the sky in the original photo, so I swapped out the old sky for a new one. To do this I used the pen tool to select the area of the photo I planned to keep. I brought in the photo of the sky I wanted as a new layer, and put a layer mask over the layer with the selection. I dragged the sky photo until I liked the part visible in the overall picture. I altered the brightness and contrast a bit to match the overall composition of the photo. I used more of the healing brushes to help the sky and the background of this photo blend in together.
Next I needed to add the butterflies by adding three new layers and then selecting one of the three butterflies on each layer using the same process I used to add the new sky. I selected the butterfly with the pen tool, added a layer mask and then sized and placed the butterfly to the desired location on the image.
Credits:
Image of Toddler: Taken and used with permission from Megan Rangel
Sky: Image created by Tirachard from freepik.com
Butterflies: Nature vector created by freepik.com
Design Principles:
- Contrast: The colors of the butterflies were used to contrast some of the browns and other earthy tones in the background of the photo.
- Repetition: When adding additional content to the photo, I used the same colors and patterns in the grass and sky to match the rest of the photo.
- Alignment: Elements were placed to create balance and unity.
Photoshop Skills:
I started by taking a .jpg photo and enlarging it a bit to create more space off to the right of the photo. To do this I used the crop tool to enlarge the canvas, selected the empty area, and then used the content aware fill option to fill the void space. I used the clone stamp, spot healing brush and healing brush to help the photo addition appear a bit more natural.
I wasn't a huge fan of the sky in the original photo, so I swapped out the old sky for a new one. To do this I used the pen tool to select the area of the photo I planned to keep. I brought in the photo of the sky I wanted as a new layer, and put a layer mask over the layer with the selection. I dragged the sky photo until I liked the part visible in the overall picture. I altered the brightness and contrast a bit to match the overall composition of the photo. I used more of the healing brushes to help the sky and the background of this photo blend in together.
Next I needed to add the butterflies by adding three new layers and then selecting one of the three butterflies on each layer using the same process I used to add the new sky. I selected the butterfly with the pen tool, added a layer mask and then sized and placed the butterfly to the desired location on the image.
Credits:
Image of Toddler: Taken and used with permission from Megan Rangel
Sky: Image created by Tirachard from freepik.com
Butterflies: Nature vector created by freepik.com
